 |
| |
 |
|
การแทรกตาราง |
|
|
|
| |
 |
|
|
|
|
|
 |
|
|
| |
 |
|
ขั้นตอนที่ 1 คลิกที่ Panel ชื่อว่า Common |
|
|
| |
 |
|
|
|
|
|
|
|
| |
 |
|
|
|
|
|
|
|
| |
|
 |
|
|
|
|
|
|
| |
|
|
|
|
|
|
|
| |
|
|
|
|
|
|
|
| |
|
|
|
|
| |
|
|
|
|
| |
|
ขั้นตอนที่ 2 คลิก Table |
|
|
|
|
| |
|
|
|
|
|
|
|
|
| |
|
|
|
|
|
|
|
|
| |
|
|
|
|
|
 |
|
|
| |
|
|
|
|
| |
|
|
|
|
|
|
|
|
| |
|
|
|
ขั้นตอนที่ 3 ใส่จำจำนวนแถวที่ช่อง Row |
|
|
| |
|
|
|
ใส่จำนวนคอลัมน์ที่ ช่อง Comlumn |
|
|
| |
|
|
|
|
|
|
|
|
| |
|
|
|
|
|
|
|
|
| |
|
|
|
|
|
|
|
|
| |
|
 |
|
|
|
|
|
|
| |
|
|
|
| |
|
|
|
|
|
|
|
|
| |
|
|
|
|
|
|
|
|
| |
|
ขั้นตอนที่ 4 ขยายตารางให้มีขนาดตามต้องการ |
|
|
|
| |
|
|
|
|
|
 |
|
|
| |
|
|
|
|
|
|
|
| |
|
|
|
|
|
|
|
| |
|
|
|
|
|
|
|
| |
|
|
|
|
|
|
|
|
| |
|
|
|
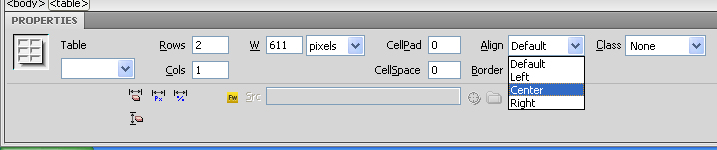
ขั้นตอนที่ 5 การจัดตารางให้ ชิดกึ่งกลาง |
|
|
| |
|
|
แล้วคลิกที่ Properties คลิก Align เลือก Center |
|
|
| |
|
|
|
|
|
|
|
|
| |
|
|
|
|
|
|
|
|
| |
|
|
|
|
|
|
|
|
|
| |
|
|
 |
|
|
| |
|
|
|
|
| |
|
|
|
|
| |
|
|
|
|
| |
|
|
|
|
| |
|
|
|
|
| |
|
|
|
|
|
|
|
|
|
| |
|
|
|
|
|
|
|
|
|
| |
|
 |
ขั้นตอนที่ 7 การใส่สีพื้นตาราง ให้คลิกแถวที่ |
|
|
| |
|
ต้องการใส่สีพื้น แล้วคลิกที่ Properties |
|
|
| |
|
คลิก Bg เลือกสีพื้นตามต้องการ |
|
|
| |
|
|
|
|
|
|
|
|
|
| |
|
|
 |
|
|
| |
|
|
|
|
|
|
|
|
|
| |
|
 |
|
|
|
|
|
| ตารางก็จะมีสีพื้นตามที่เราต้องการ |
|
|
| |
|
|
|
|
| |
|
|
|
|
| |
|
|
|
|
|
|
|
|
|
| |
|
|
|
 |
|
|
| ขั้นตอนที่ 8 การใส่ขอบตาราง ให้คลิกที่ขอบ |
| ตารางด้านขวาสุด |
| |
|
| |
|
 |
|
|
|
|
|
| คลิกที่ Properties เลือก Border ใส่ตัวเลขเข้าไป ตั้งแต่ 1 ขึ้นไป |
| |
|
|
| |
|
|
| |
|
|
|
|
|
|
|
|
|
| |
|
|
|
 |
|
|
| ก็จะได้ขอบตารางขึ้นมาตามขนาดตัวเลขที่เรา |
| ใ่ส่ลงไป |
| |
|
| |
|
|
|
|
|
|
|
|
|
| |
|
|
|
|
|
|
|
|
|
| |
|
|
|
|
|
|
|
|
|